
Uploading medical documents remotely sounds simple until you're staring at a portal with no idea where the upload button is, what file type to use, or whether your document even landed in the right place. For remote patients managing chronic conditions, seeking specialist referrals, or navigating cannabis card consultations, a failed upload can mean delayed care or a missed appointment window. This guide walks you through every stage of the process, from understanding how patient portals are structured to knowing exactly what happens after you hit submit, so you can upload with confidence every single time.
Table of Contents
- Understanding portal systems and upload pathways
- Technical file requirements: formats, sizes, and naming rules
- Step-by-step: uploading documents through a patient portal
- How uploaded files are handled and who reviews them
- What most guides miss about remote medical uploads
- Streamline your medical document uploads with Jiffy Doctor
- Frequently asked questions
Key Takeaways
| Point | Details |
|---|---|
| Know your portal workflow | Uploading success starts by choosing the right path—message thread versus dedicated document center. |
| Follow file rules | Check format, size, and filename requirements so your upload isn’t rejected. |
| Select the right category | Uploads routed as medical or non-medical receive different types of review and follow-up. |
| Expect confirmation and review | Most systems notify you after upload and handle clinical documents promptly. |
| Avoid common pitfalls | Permission issues or misrouted uploads are the top reasons documents don’t reach the right place. |
Understanding portal systems and upload pathways
To address confusion around where and how files should be uploaded, we start by breaking down today's main remote healthcare portal upload options.
Patient portals are secure, web-based platforms that connect you directly to your healthcare provider's system. Think of them as a private inbox and file cabinet rolled into one. But not all portals are built the same way, and the upload pathway you choose matters more than most patients realize.
Two main upload routes exist in most portals:
- Secure message thread: You compose a message to your provider's office and attach a file directly in the message composer. This is the most common route for document submissions tied to a specific clinical question or visit.
- Document center: A dedicated area where you can upload files independent of a message. This space often houses scanned records, insurance documents, and other reference materials that don't require an immediate clinical response.
Remote patients typically upload medical documents using a secure patient portal workflow, often via a message thread, attaching files from a computer browser or mobile app and submitting them to a specific clinician or office. The routing matters because a document sent through the wrong pathway may sit unreviewed for days.
Some portal ecosystems support file uploads via a dedicated Document Center that houses scanned documentation and allows both patient and proxy actions within the MyChart experience. Proxy access is especially relevant for caregivers managing uploads on behalf of elderly parents or patients with disabilities.
Choosing the right intent is critical. Most portals ask you to select a purpose or category when uploading, such as "medical record," "insurance document," or "prior authorization." That selection determines which office or staff member receives the file. Selecting the wrong category is one of the most common reasons documents end up in the wrong queue.
| Portal | Upload location | Proxy support | Mobile upload |
|---|---|---|---|
| MyChart | Message center and Document Center | Yes | Yes |
| CPCMG HealthHub | Secure message thread | Limited | Yes |
| SSA portal | Dedicated upload tool | No | Partial |
| General telehealth portals | Message composer | Varies | Yes |
The rise of telehealth and remote therapy has made digital document submission a routine part of healthcare, not an exception. Understanding your portal's structure before you need to upload something urgent saves you real time and real frustration.
Technical file requirements: formats, sizes, and naming rules
Having explored where uploading happens, let's clarify the file types and rules to make sure your documents are accepted on the first try.
Most patients assume any file will work. It won't. Patient portals are built with specific technical guardrails, and failing to meet them means your file gets rejected before a single staff member ever sees it.
Accepted file formats typically include:
- PDF (most universally accepted)
- JPG and JPEG (photos of documents)
- PNG (screenshots and scanned images)
- TIFF (used in some clinical imaging contexts)
- DOC or DOCX (accepted by some portals for non-clinical documents)
Common patient portal upload implementations require patients to upload electronic files such as PDFs or images and impose technical constraints covering file format, size, and filename rules. PDF is the safest choice because it preserves formatting, is universally readable, and compresses well without losing quality.
File size limits are usually set at 10 MB per file, though some platforms allow up to 25 MB. The Social Security Administration, for example, allows up to 25 MB per file with a cap of 50 files per submission session. Most clinical portals are stricter.
Filename rules are where many patients get tripped up. Here's what to avoid and what to use instead:
- Avoid special characters such as slashes, ampersands, asterisks, or pound signs in your filename. These can cause the upload system to misread the file path.
- Avoid spaces in filenames. Use underscores or hyphens instead (e.g., "Lab_Results_2026.pdf" rather than "Lab Results 2026.pdf").
- Keep filenames short and descriptive. Something like "BloodWork_Jan2026.pdf" is far better than "scan0001_final_FINAL_v3.pdf."
- Include the date in the filename when possible. This helps clinical staff identify the document quickly without opening it.
- Use lowercase letters when in doubt. Some systems are case-sensitive in ways that aren't immediately obvious.
| Issue | What happens | Fix |
|---|---|---|
| Wrong file format | Immediate rejection | Convert to PDF or JPG |
| File over size limit | Upload fails silently or with error | Compress using a free tool |
| Special characters in filename | System error or routing failure | Rename before uploading |
| Corrupted file | Upload appears to succeed but file is unreadable | Re-export from original source |
Pro Tip: Before uploading any document, open it on your own device to confirm it's readable. A corrupted PDF that looks fine on your screen may display as blank on the provider's end.
Step-by-step: uploading documents through a patient portal
Now that you know the requirements, let's walk through exactly how most remote patients upload their medical documents, from finding the right portal option to a successful upload.
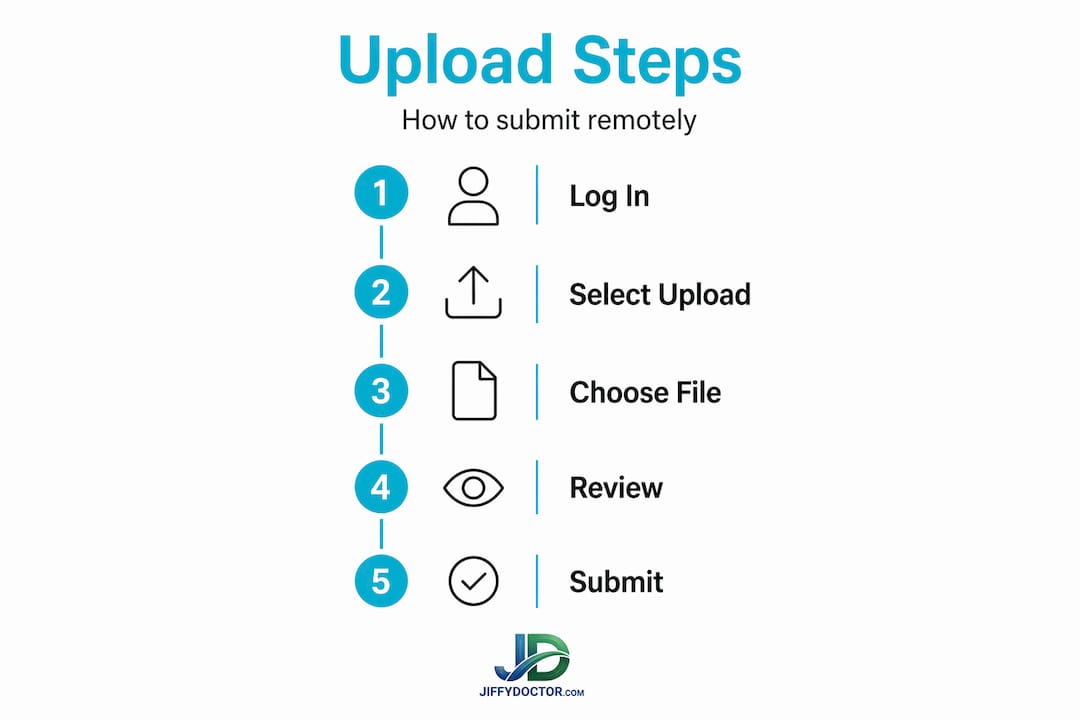
A reliable upload methodology involves four core steps: converting documents into acceptable electronic file types, ensuring file size and name compliance, attaching via the portal's prescribed interface such as the message composer or upload area, and selecting the correct intent or category so the document routes to the right office and review path.
Here's how that plays out in practice:
- Log into your patient portal using your secure credentials. If you're on mobile, use the official app rather than a browser for the most stable upload experience.
- Navigate to the correct upload area. If your document is tied to a specific question or appointment, go to the secure message section and compose a new message to the relevant office. If it's a standalone record, head to the Document Center.
- Select your intent or category. This step is often skipped, but it's essential. Choose "medical record," "lab result," "insurance," or whichever category matches your document. This determines the review pathway.
- Click the attachment or upload button. Look for a paperclip icon or a button labeled "Attach File" or "Upload Document." On mobile apps, this may appear as a plus sign or a camera icon.
- Select your pre-prepared file. Navigate to the file on your device. If you followed the naming and format rules above, this step should be seamless.
- Review before submitting. Most portals show a preview or a filename confirmation. Double-check that the right file is attached and the category is correctly selected.
- Submit and note the confirmation. After submission, look for a confirmation message, a timestamp, or a notification. Screenshot or note this for your records.
"Selecting the wrong category during upload is the single most common reason a document doesn't reach the intended clinician. Take thirty seconds to verify before you hit submit." This is advice worth keeping in mind every time you use a portal.
What to do if you hit an error: First, check the file format and size. If those are fine, try a different browser or switch from mobile to desktop. Some portals have known compatibility issues with certain browsers. If the upload continues to fail, contact your provider's office directly and ask about alternate submission methods such as fax or secure email.
Pro Tip: If you're uploading documents for a cannabis card consultation or a telehealth visit, submit your files at least 24 to 48 hours before your appointment. This gives clinical staff time to review them and prevents delays in your care.

How uploaded files are handled and who reviews them
You've uploaded your document successfully. Now, what happens behind the scenes? It's important to understand who reviews your information and what comes next.
Not all uploaded documents go to a clinician. This surprises many patients. The review pathway depends entirely on how you categorized the document and which portal area you used.
Two distinct review tracks exist:
- Clinical review track: Documents submitted as part of a medical inquiry or attached to a clinical message are queued for review by a nurse, medical assistant, or physician. These are typically reviewed within one to three business days, though urgent flags can speed that up.
- Non-clinical review track: Documents submitted to a general document center without a clinical category may be filed in your chart without any active review unless a provider specifically looks for them during a visit.
Uploads can be used for different purposes with different clinical review expectations. Non-urgent or non-medical document submissions may not be reviewed by a clinician unless there is a visit associated with the record.
File-uploaded documents are often handled within HIPAA-governed clinical workflows, meaning providers review and incorporate documents into the patient record. For other contexts, uploads can feed evidence-review processes such as disability determinations or insurance authorizations.
What to expect after uploading:
- A confirmation notification via the portal or email
- The document appearing in your chart or document history within 24 to 72 hours
- A follow-up message from your provider's office if additional information is needed
- No response if the document was non-clinical and no visit is scheduled
Improving psychiatric help accessibility is one reason telehealth platforms have invested heavily in streamlined upload systems. When patients can submit records without friction, providers can deliver faster, better-informed care.
"Knowing whether your upload triggers a clinical review or simply lands in a file archive changes everything about how you should follow up. When in doubt, send a message to your provider's office confirming receipt."
What most guides miss about remote medical uploads
While most guides focus on the basics, the real difference between a seamless upload and a frustrating experience is often in the workflow nuances and human factors. Let's dig into what truly matters for remote patients.
Here's what we've observed after working with patients across dozens of telehealth interactions: the technical requirements are rarely the actual problem. Most patients can figure out how to convert a file to PDF. The real friction points are subtler.
Workflow routing is where things break down. Edge cases commonly stem from permissioning and workflow routing, specifically whether the submission is treated as clinical or non-clinical, whether proxy access is in place, and whether the clinician office associated with the upload is correctly selected. A document sent to the wrong office within the same portal can sit unread for weeks.
The clinical versus non-clinical distinction is underappreciated. Patients often assume that because they uploaded something to a healthcare portal, a doctor will see it. That's not always true. If your document doesn't trigger a clinical review pathway, it may simply be archived. For anything time-sensitive, always attach your upload to a direct message to your provider.
Proxy permissions are often set up incorrectly or not at all. If a family member manages your healthcare and tries to upload on your behalf without proper proxy access, the upload may fail silently or land in an unmonitored queue. Set up proxy permissions proactively, not in the middle of a care episode.
The most time-consuming mistake we see is patients uploading the wrong version of a document. They upload a draft, an older record, or a file that was meant for a different provider. Systems tend to enforce strict upload requirements and fail closed by rejecting noncompliant files, prompting retry or alternate submission such as mailing. But even when a file is technically accepted, uploading the wrong content wastes everyone's time.
Our honest take: treat every upload as if you're preparing a professional submission. Review the file, check the category, confirm the destination office, and follow up if you don't receive confirmation within 48 hours. That level of intentionality is what separates patients who get timely care from those who fall through the cracks.
Streamline your medical document uploads with Jiffy Doctor
Ready to make remote uploads easier? Here's a trusted solution for streamlined, secure document submission.
Managing medical documents remotely doesn't have to involve navigating confusing portals or worrying whether your files reached the right person. Jiffy Doctor remote services are built specifically for patients who need fast, secure, and straightforward access to healthcare consultations and document submission, including for cannabis card recommendations and other telehealth needs.
With Jiffy Doctor, you can upload your medical documents directly through a streamlined digital interface, connect with licensed healthcare professionals quickly, and manage your entire consultation from home. No waiting rooms, no confusing portal navigation, and no uncertainty about whether your documents were received. The platform is designed for busy people who need reliable medical guidance without the friction of traditional clinic visits. If you're ready to take control of your remote healthcare experience, Jiffy Doctor is the next step.
Frequently asked questions
What if my document won't upload to the patient portal?
Check file format, size, and naming rules first, since most rejections are due to noncompliance with strict upload requirements. If problems persist, contact your provider's office and ask about alternate submission methods such as fax or secure email.
Can I upload multiple medical records in one go?
Most portals allow multiple uploads per session, but per-file and total-number limits apply. The SSA, for example, allows up to 50 files at 25 MB each per submission, though clinical portals are typically more restrictive.
Who reviews my uploaded documents and when?
Documents uploaded as medical inquiries are queued for clinician review, while non-medical file submissions may not be reviewed by a clinician unless linked to a scheduled visit.
How do I know my documents were received?
Most portals display a confirmation message or send an email notification immediately after a successful upload. If you don't see confirmation within a few hours, check your document center or call your provider's office directly.
Can my proxy upload medical documents for me?
Yes, provided they have proxy access properly established in the system. Major portals like MyChart support secure proxy uploads and permissions, but this access must be set up in advance through your provider's office.